前提として、既に "sencha generate app" コマンドなどで、いじれる Sencha アプリができているものとします。 いじるのは app/view/Main.js です。 また、参考にするのは Sencha Touch サーバーを立てたら入っている Kitchen Sink サンプルです。
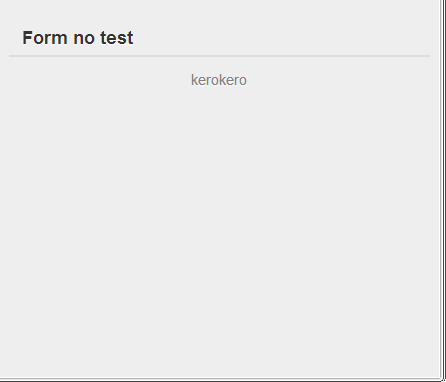
Ext.define('Funini.view.Main', {
    extend: 'Ext.form.Panel',
    xtype: 'main',
    requires: [
        'Ext.form.FieldSet',
    ],
    id: 'mylist',
    config: {
        items: [
            {
                xtype: 'fieldset',
                id: 'fs1',
                title: 'Form no test',
                instructions: 'kerokero',
            },
        ],
    },
});
こんな感じです。
Ext.define('Funini.view.Main', {
    extend: 'Ext.form.Panel',
    xtype: 'main',
    requires: [
        'Ext.form.FieldSet',
    ],
    id: 'mylist',
    config: {
        items: [
            {
                xtype: 'fieldset',
                id: 'fs1',
                title: 'Form no test',
                instructions: 'kerokero',
            },

            {
                xtype: 'button',
                id: 'btn_ok',
                text: 'OK',
            },

        ],
    },
});
こんな感じです。ボタンが出来ました。押せます。
Ext.define('Funini.view.Main', {
    extend: 'Ext.form.Panel',
    xtype: 'main',
    requires: [
        'Ext.form.FieldSet',
    ],
    id: 'mylist',
    config: {
        items: [
            {
                xtype: 'fieldset',
                id: 'fs1',
                title: 'Form no test',
                instructions: 'kerokero',
            },

            {
                xtype: 'textfield',
                name: 'name',
                label: 'Name',
            },

            {
                xtype: 'button',
                id: 'btn_ok',
                text: 'OK',
            },
        ],
    },
});
入力できるようになりました。

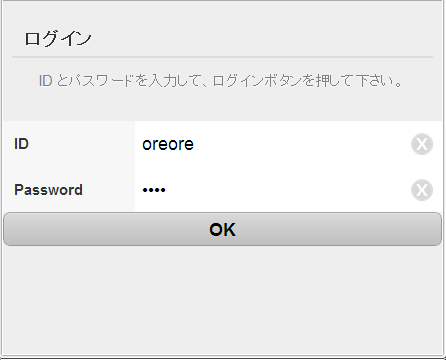
Ext.define('Funini.view.Main', {
    extend: 'Ext.form.Panel',
    xtype: 'main',
    requires: [
        'Ext.form.FieldSet',

        'Ext.field.Password',

    ],
    id: 'mylist',
    config: {
        items: [
            {
                xtype: 'fieldset',
                id: 'fs1',
                title: 'ログイン',
                instructions: 'ID とパスワードを入力して、ログインボタンを押して下さい。',
            },
            {
                xtype: 'textfield',
                name: 'name',
                label: 'ID',
            },

            {
                xtype: 'passwordfield',
                name: 'password',
                label: 'Password',
            },

            {
                xtype: 'button',
                id: 'btn_ok',
                text: 'OK',
            },
        ],
    },
});
表示するとこんな感じです。